Posts

Showing posts from 2017

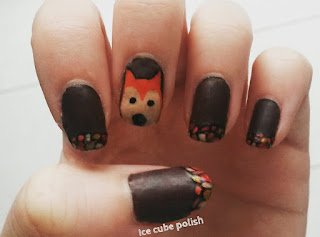
Open cut - Halloween nails

Image
Hi everyone, It is Halloween again and this means Halloween nails. Step 1: Start with a clear base coat. Step 2: Now quickly paint many layers of a clear or nail coloured polish. Step 3: Using a little dotting tool, pull open the layers of polish, make sure the edges of the holes are uneven. Step 4: Seal the nails with a matte top coat Step 5: Then fill in the holes using different colours of blood red and finish off the holes with a shiny top coat. Step 6: Then paint the uneven edges using watered down acrylic light brown and white . Have a spooky Halloween.

Dublin Nails

Image
Hi everyone, I was lucky enough to go on a school trip to Dublin last week. And since I like painting travel themed nail art I of course had to paint some Dublin nails. Step 1: Paint the thumb white, 3 nails green and one gold . Step 2: Using a light green, paint little shamrocks on two of the nails. An easy way to do this is to think of the shamrock as four little hearts. Step 3: If you have a gold nail decal ad it to the gold nail. If not ad a spot of black instead. Step 4: Now paint the Irish flag on the thumb using tape. Step 5: Paint a black pot on the last green finger and ad some shine using a grey and white. Step 6: Using a gold glitter polish add the glitter to the pot, making it look like gold coins. Then using a gold shimmer polish add some gold to the edges of the shamrock. Step 7: Seal the design using a top-coat.  Hope you all have a great week.

Autumn fox nails

Image
Hi everyone, The leaves have started changing colour now. Therefore, I thought I would paint a little autumn fox and some autumn leaves. Step 1: Paint all nails brown. Step 2: Paint a black French tip on all nails except one. Step 3: Using a small dotting tool, paint different autumn coloured leaves, remember to drag the dotting tool slightly before lifting to get the leaf shape. Step 4: Now over to the fox. Start with an orange head and ears, then paint two beige strokes over the orange. Step 5: Paint the fox’s nose with a huge dotting tool and its eyes with a smaller one. Step 6: Finish off with a matte top coat. Have a very nice autumn day 

Half and half nail art

Image
Hi everyone, I bought to new polishes recently and I needed to test them out. So here is my half and half manicure. Step 1: Paint all nails gold. I used MaXfactors angel. Step 2: When all nails are completely dry place tape over half of the nail. Step 3: Using a nude or pink polish paint all the nails again. I used HM’s 504 Step 4: Remove the tape carefully while the nude polish is still semi wet. Step 5: Finish off with a topcoat. Hope you all have a nice week. 

The Lion King musical nail art

Image
Hi everyone,   On my trip to London I also went and saw The Lion King. As you can probably tell I am a bit of a musical fan. The show was amazing; the costumes, the choreography, the jokes. So, I decided to paint the poster on my thumbnail like I did with Wicked. Step 1: Paint the whole nail yellow. Step 2: Start by lining the lions face in black, then add the eyes, nose and mouth.  Step 3: Paint the lion’s mane using a thicker black. Then add a little yellow, to make the stripes more prominent. Step 4: Finish off with a top-coat. Hope you all have a nice week.

Wicked nail art

Image
Hi everyone,   On my trip to London I also went to the theatre and saw Wicked. It was incredibly cool; the singers were amazing and some of the dialog was hilarious. I decided to paint the iconic poster on my thumbnail.   Step 1: Paint the whole nail green. Step 2: Start going in with the black about halfway down the nail. Try to keep the right side of the nail and Elphaba's face polish free.  Step 3: Now go in with the white, making sure it doesn’t mix with the black. Step 4: Paint Glinda’s face and hand as well as her hair and eye. Then paint Elphaba’s lips. Step 5: Finish off with a top-coat. Hope you all have a nice week.

Diana, her fashion story nail art

Image
Hi everyone, I was fortunate enough to go to London in my summer holidays. My mom and I went to the Diana, her fashion story exhibition together, I thought it was very interesting although there was a bit too many people there. I decided to do my nails before I left inspired by four dresses I knew were going to be featured in the exhibition. Step 1: Start by painting all nails white. Step 2: Paint the first dress using a black and red polish. Step 3: Paint the second dress using a light pink and ad details in bright white. Step 4: Paint the third dress using a turquoise polish and then add silver, blue and green glitter. Step 5: Paint the last dress using a dark blue polish.   Step 6: Finish off with a top coat.  The dresses I painted were:  1) Black velvet bodice and red silk taffeta skirt, evening dress by Murray Arbeid (1986) 2) Pink satin with white raw silk on collar and cuffs by  Catherine Walker (1987) 3) Green sequined evening dress by

Dunkirk movie nail art

Image
Hi everyone,  I watched Dunkirk a while back at the Odeon Theater in Lester Square and really enjoyed it. I therfore had to create a Dunkirk themed manicure. Step 1: Start by painting all nails black. Step 2: Then paint different coloured lines on a plastic bag. Starting with a light blue, then a dark blue, and end with a sea blue. Step 3: Seal the lines with a top coat and wait for it to dry. Step 4: Then carefully peel the nail polish off the bag and cut it into letters. Step 5: Using a top coat as glue, stick the letters to the nails, and seal with a layer of top coat on top.  Hope you all have a nice week. 

Wonder Woman nail art

Image
Hi everyone, I watched wonder woman a while back and really enjoyed it. I therfore had to create a WW themed manicure. Step 1: Paint the thumbnail white and the rest dark blue. Step 2: Paint the WW symbol on one of the blue nails using a gold polish. Step 3: Stamp on the background of the thumb using a light blue and yellow at the top, then orange, and then red and black at the bottom of the nail. Add top coat to mix the colour together. Step 4: Now using a black paint on the black horizon and stamp on a gold circle in the middle. Then ad black and red to the edges. Step 5: Using a black polish paint on Diana kneeling with her sword and shield. Using a very light white polish stamp on some clouds. Step 6: Finish off with top coat. Hope you all have a nice week. 

Ciaté Caviar ice cream nail art

Image
Hi everyone, I recently bought Ciaté's caviar nail set and obviously, I had to test it out. So, I created some ice cream nails. For anyone thinking of buying this set, I would say that the pink is very pretty, but it is a very sheer colour, I used 3 layers. The beads are colourful but if you attempt to use a top-coat over them they will lose that colour. So, I would say don't paint these nails if you are going to be using your hands a lot or if you are going to the beach. Anyway, here are my Ciaté caviar ice cream nails. Step 1: Start with a good base coat. Step 2: Paint one nail white and three nails light pink. If you want a stronger colour you could start with a white coat underneath and then paint the pink over that. Step 3: Paint the fifth nail pink and while the polish is still wet sprinkle the beads over the nail. It is a good idea to make sure the other nails are completely dry before sprinkling, so that the beads won't get struck on the other nails. Step

Greenland nail art

Image
Hi everyone, Last year I went to Greenland. It was an amazing experience; I went kayaking and I saw some whales.  I realized that I had not yet shared my nails with you. So here are my Greenland nails, they were inspired by the photo next to them. Step 1: Paint the thumbs white, 5 nails a greyish beige and 3 nails a metallic blue. Step 2: Using a thin white brush add icebergs and waves to the nails. Step 3: Paint Greenland’s flag u sing a red polish and some tape. Step 4: Using the same metallic blue from the beginning, paint some whales and a kayak, as well as water details on the beige nails. Step 5: Paint the houses using a variety of bright colours (I used yellow, orange, blue, green and red) Step 6: Paint the roofs on the houses using a black liner. Then using the white again paint an Inuit person in the kayak and horns on the narwhals. Step 7: Finish off with a matte top-coat. Hope you have a lovely week.

Nautical nail art

Image
Hi everyone, Hope you are enjoying the good weather and just the summer in general. I have been wearing a lot of red and blue lately so I thought I would make a design incorporating those colours. Step 1: Paint 7 of your nails shimmering white and 3 nails blue. Step 2: Using the blue polish brush, paint one big stripe down the middle of one nail. Using the same big brush, paint 3 diagonal wavy lines on another nail, and one big circle on a third nail. Step 3: Using a red brush add a red wavy line in the middle of the blue line. Then paint two red horizontal lines on a white nail. Using a thinner brush paint the edge of the blue circle red. Then add small spots on a forth nail. Step 4: Using a blue liner brush paint an octopus, a sailing ship, and some small fish. Step 5: Using a dotting tool, add white dots to two blue nails and two dots on the octopus as eyes. Then add blue dots to the nail with the red dots. Step 6: Using a thin white brush, paint an anch

Vertical glitter nail art

Image
Hi everyone, I’ve been very busy with exams lately so I thought I’d share this super easy manicure for when you don’t have time for something fancy. Step 1: Start with a clear base coat. Step 2: Using tape paint the middle of the nail black or just stick on some black tape. Step 3: Using a chunky glitter polish and tweezers to place the individual pieces in a pattern. Step 4: Finish off with a top coat to seal in the glitter.  Have a lovely week. 

London nail art 2014

Image
Hi everyone, Hope you all had a great Easter. This will be another throw-back post to London nail art I did back in 2014, which I at the time was super proud of, but now i notice all the things i would have done better or differently now.  Step 1: Paint all nails white. Step 2: Using a red polish, paint a London bus, a telephone box, the guard’s shirts and part of the Union Jack. Step 3: Paint the tip pf all the nails on one nail black. Then Paint the Gherkin, Big Ben and Tower Bridge. Then using the same polish paint the wheels on the bus and the guard’s hat and trousers. Step 4: Paint the rest of the Union Jack using a navy-blue polish . Step 5: Then finish off with a top coat. Have a lovely week.  

Easter nails 2017

Image
Hi everyone, So as per tradition it is time for another Easter manicure. I did two different designs the first was the easter bunny and the other was chicks. Step 1: Paint one nail orange, one green, four white and four yellow. Step 2: Using a small dotting tool paint flowers made up of five white spots on the green and orange nail. Then using the dotting tool paint a dot in the middle of the flower in the original nail colour Step 3: Using a medium dotting tool paint yellow dots on two of the white nails and paint multi coloured dots on a third white nail. Step 4: Paint a carrot on the last white nail and then paint a rabbit on one of the yellow nails. Step 5: Using orange paint write Easter on the white thumb and paint orange Easter eggs on the yellow thumb. Step 6: Cut some tape into triangles and place them on two yellow nails then paint the bottom of the nails white this will be the shattered egg. Step 7: Paint a beak and some eyes on the chicks. Ste

Finding Dory nail art

Image
Hi everyone, I watched Finding Dory again yesterday, and it’s still a very good movie. So, I thought I would post the nails I did when I went and saw the movie. These were inspired by Mini from the Cute polish channel on YouTube, I just made the Finding Dory nail. Finding Dory nail: Start by painting the thumb dark blue, then add some blue glitter. Then in white write Finding Dory. Hope you have a nice week.

Easter nail art 2015

Image
Hi everyone,   I don't usually write throwback posts, but i am rather proud of my Easter nails, even if they are a couple of years old. So, here is my Easter manicure 2015.  You will notice that there are three thumb nails and this is because the Cadbury creme egg nail came off on holiday, so I painted the sheep as a quick replacement. Step 1: Paint three nails orange, three white, one brown and one blue. Step 2: Using a normal dotting tool, paint orange spots on one of the white nails, and a couple of spots on another white nail. Step 3: Using a big dotting tool, paint the rabbit faces. Step 4: Using a white stripe tool, paint the rabbit’s ears and the cross. Step 5: Using an orange stripe tool, paint carrots on one white nail and add stripes to the white nail with the spots. Step 6: Paint a blue half circle on the brown nail and add some small Easter eggs. Step 7: Paint some small flowers on the blue nail. Step 8: Paint the carrot top

Cinderella nail art

Image
Hi everyone,  I love Disney movies, one of my favourites when I was younger was Cinderella. Therefore, I thought I would paint some Cinderella nails. Step 1: Paint all nails except one blue and the last one beige. Step 2: Add some glitter to one nail to represent the stars in the sky. Step 3: Using white, paint a roman number twelve, a high heel shoe and a clock. Step 4: On the other hand, paint the carriage in white and add some gold and glitter details. Step 5: Using a powder blue paint the fairy godmother, then add a big purple bow. Step 6: On the blue thumb paint Cinderella and the Prince. Step 7: On the last nail paint Cinderella’s face. Paint the hair with yellow and gold paint and then paint the eyes using black and white.  

Brown nail art

Image
Hi everyone, A friend of mine had a birthday party with a brown theme, and of course I had to paint my nails brown aswell. Step 1: Paint all nails brown. Step 2: Tape of the areas you want to keep free off glitter. Step 3: Sponge on the glitter to get better coverage. Step 4: Add a top coat. Hope you have had a nice week. 

La La Land nail art

Image
Hi everyone, As usual I painted my nails before going to the cinema. As someone who loves musicals I decided to go and watch La La Land and it is definitely amongst my favourite movies of all time. Anyway here are my La La Land nails. Step 1: Paint all nails dark blue. Step 2: Using a sponge, create an ombre effect with dark blue at the top and purple mixed with light blue at the bottom. . Step 3: Paint the bottom edge of all nails black. Then a blue line on top of that, making the edge rounded. Step 4: Next paint a light blue mixed with purple line op tom off that and add glitter, this will be the city. Step 5: Now paint a black line on top, make sure that the line rises and falls. Step 6: Add glitter to the top of the nail, this will be the stars. Step 7: To paint the lamp, start by painting the bulb using a shimmering white. Next paint the rest using a light blue mixed with silver. Step 8: Now on to painting Emma Stone and Ryan Gosling. Start with Emma

Oscars nail art

Image
Hi everyone, Did you see the best picture mix up, possibly the most shocking moment in Oscar history? Anyway, here are my Oscars nails and apologies for being a bit late with these. Step 1: Paint one nail and one thumb nail black. Step 2: Paint the rest gold. Step 3: In gold paint write Oscars on the thumb nail. Step 4: Paint an Oscar figurine on the other black nail: by starting with one long straight line and then paint on and around the line, to make sure the Oscar is straight. Hope you all had a nice Oscars evening. 

Dubai nail art

Image
Hi everyone, Just come home from a lovely trip to Dubai, which was, of course, accompanied by a themed manicure. I decided to having one hand painted with old Dubai and one with new Dubai. Step 1: Paint 6 nails light blue, two dark blue and two red. Step 2: Paint a sand coloured French tip on 5 of the 6 light blue nails. Step 3: Using the sand colour, paint the world using a very small dotting tool. Step 4: Using the same colour paint a palm on the other dark blue nail. Step 5: On the empty light blue nail, paint a dark blue French tip and a straight silver line with a white curve. Step 6: Using the silver, paint the Burj Khalifa starting with the centre line . Step 7: On the other hand, paint a sun in the upper right corner and some camels. Step 8: Using tape to cover the areas you want to keep clear, paint the Dubai flag and the UAE flag.

Negative space paintbrush nails

Image
Hi everyone, I have been seeing a lot of negative space nail art around, so I thought I would try one out. Step 1: Paint two nails completely pink and then paint ¾ of the third nail pink. Step 2: Now over to the paint brush, paint some black lines these will be the brush hairs. Step 3: Paint a silver line under the black lines. Step 4: Using a brown polish paint a handle for the brush Step 5: Finish off with a top coat. Have a very nice day.

Breakfast at Tiffany’s nail art

Image
Hi everyone, I was lucky enough to receive the OPI Breakfast at Tiffany’s - 4 mini kit for Christmas. Therefore, I obviously had to try it out.   Step 1: Paint all nails silver. Step 2: Put a hole punch sticker or half-moon sticker on each nail, at the top. Step 3: Paint all nails Tiffany blue (OPI - I believe in manicures). Step 4: Using a dotting tool drop on some clear polish, and add a blue rhinestone. Step 5: Finish with a shiny topcoat.

Snow nails

Image
Hi everyone, Welcome to 2017 with  nice and simple snow nails. Step 1: Paint all nails light blue. Step 2: Then paint french tips on all nails, try to make it a bit uneven so it looks like snow. Step 3: Using a tiny dotting tool, paint small dots on every nail. Step 4: Finish off with a top coat. Have a lovely January.